Although this assigment raises some ethical issues that I disagree with, I will deal with solving and explaining this problem. The assigment is to design a game of chance for elementary school students (assigment says so), where a randomly chosen number from 1 to 6 will be printed on the LCD display – in simpler terms, it is a simulation of throwing a dice.
Analysis and recommendations for solving the assignment
I’ll start with pushing the button, as mentioned earlier the best method for handling this is to use interrupts. This is necessary in order to instantly register a keystroke and react immediately to that event. In this case, it is the generation of a random number between 1 and 6. It can also be said that pressing the key calls the generisiBroj function.
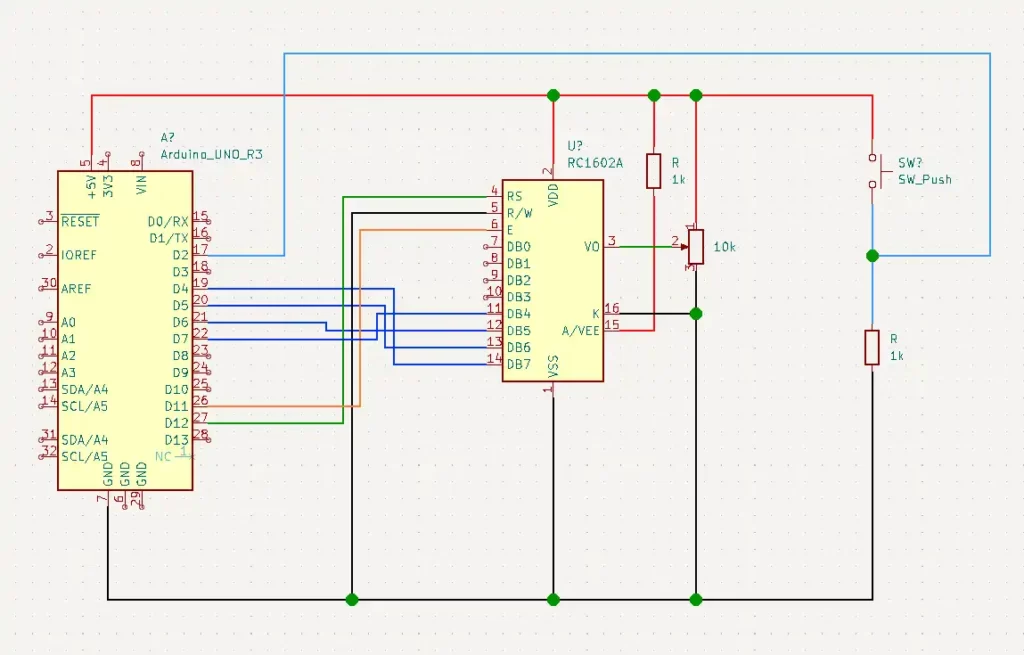
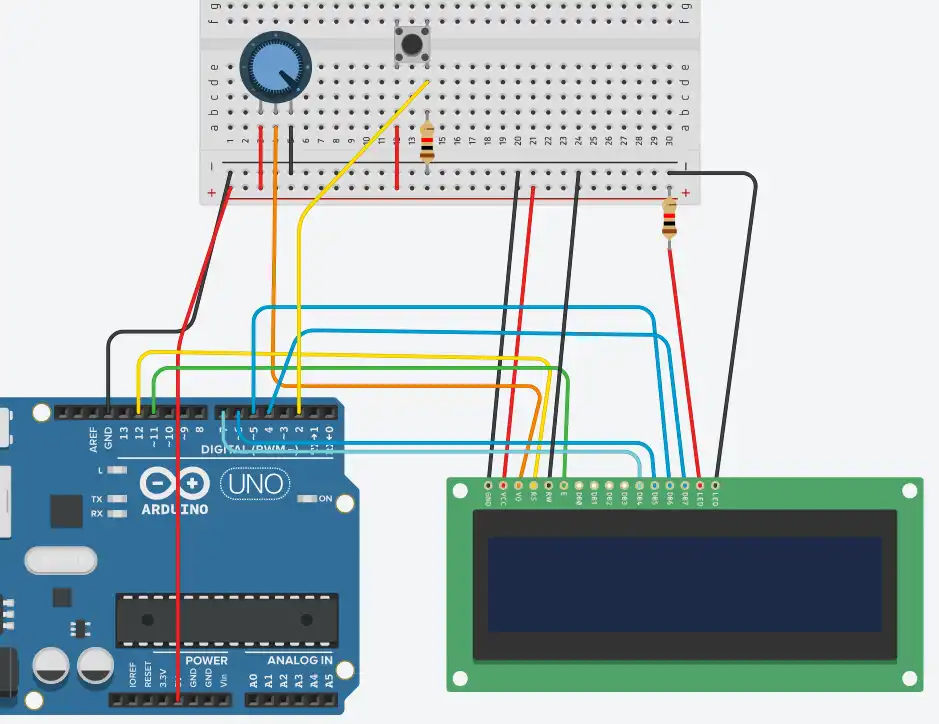
Connecting the LCD display is more or less standard, more can be found in the post about the LCD display. The digital pins of the Arduino board are connected to the pins of the LCD display module – RS (Register Select), E (Enable) as well as the data pins from D4 to D7 (using 4 pins for data transmission, which means that the LCD display works in 4-bit mode).
Of the constants in the solution, there is one that refers to the pin to which the button is connected.
There are four variables, one that will represent the LCD display module, then a string that will contain a message about the generated number (a string display of the format “Your X number is Y”), a counter that will contain information about the number of dice rolls and a volatile variable which will store information about a randomly generated number.
In the structural organization of code, I like to use functions to make the code itself more readable and organized into logical blocks that do a specific task. These are functions generisiBroj, kreirajPoruku and prikaziPoruku.
Electrical scheme and wiring diagram


The electric circuit consists of:
- microcontroller (MCU),
- LCD Display,
- potentiometer,
- push button, and
- other necessary components for the circuit implementation.
Tasks needed to be executed by program:
- display the text “Welcome” which will scroll from left to right for 3 seconds and then from right to left for another 3 seconds;
- after displaying the welcome message, the display shows the message “Throw the dice”;
- by pressing the key on the display, “Your X number is Y” is written in the top row (where X is the ordinal number of the roll, and Y is a random number from 1 to 6;
- in the bottom line, it is necessary to display the message “Repeat the throw” if the number 6 is obtained.
Video tutorial
Sketch (program) explained
Definition section
In this task, it is emphasized that an LCD display is used to display a randomly generated number. In order to work easily with this module, it is necessary to include the external library LiquidCrystal.hfrom the form of the library manager.
The variable btn is defined as an integer constant and its value is 2 (there is a button connected to digital pin 2 of the Arduino, hence the value). As a constant, its value does not change during the execution of the program (otherwise there would be unwanted behavior of the electrical circuit).
The next variable randBroj will store information about the random number. This variable will be assigned a value in the generisiBroj ISR function that is executed on each button press. This is possible by using interrupts. It is a good practice to define such a variable as volatile.
The variable brojac variable stores information about the number of throws. The value of this variable will be 1, except when the random number has the value 6, in which case the brojac is incremented by 1.
An auxiliary variable of type String that stores the message displayed on the display is of course the poruka. Its purpose will be explained in more detail in the kreirajPoruku function.
Finally, there is the definition of the variable lcd which will represent the LCD display module. Its parameters are the arduino pins to which the module pins RS, E, D4-D7 are connected.
Setup section
Short content of the setup function, but it allows a lot. First, the LCD module is initialized and its size is defined. The module has 16 columns and 2 rows, hence these values in the function begin.
The prikaziPoruku function is called. More details about her later.
Finally, the program is told to expect a change in the signal on digital pin number 2 of the Arduino. The moment a change occurs, the generisiBroj function will be called. The change in this case is caused by pressing the button.
Loop section
At the beginning of the loop there is an if block whose purpose is logical control. When generating a random number, the possible values are between 0 and 6, so this if block eliminates the possibility that the randomly generated number has the value 0. The moment the value of the random number is different from 0, the condition of the if block will be true and the code in to the body of the block will be executed.
The variable poruka stores string returned by function kreirajPoruku. More on the feature will follow.
Then the display cursor is set to the first column, with the setCursorfunction. Row and column indexing starts at 0, so these values are specified in the function call. The contents of the display are cleared and then the string stored in the poruka.
The task defines that the message “Repeat throw” is displayed in the second line if the user got the number 6. We implement this with another if block. If the obtained value is 6, the condition will be true and the cursor will be positioned on the first column of the second row, the required string “Repeat throw” will be printed and the value of the counter variable will be increased by 1 because the dice is thrown again by the same player. If the condition is false, the counter variable will retain the value 1.
Outside the first if block, the value of the randBroj variable is set back to 0. This is done to keep the condition of the first if block false until the button is pressed. In this way, uncontrolled increase of the brojac variable and flickering of the text on the display, which are undesirable behaviors in the operation of the electric circuit, are avoided.
Function – generisiBroj
This is an ISR (ISR – Interrupt Service Routine) function, which means that it is executed the moment an interrupt occurs, as defined in the attachInterrupt function (the leading edge of the pulse on digital pin number 2 of the Arduino). The only thing this function will do is generate a random number using the function random.
Function – kreirajPoruku
What is characteristic of this function is that it has a return value of type String, which can be seen in its definition. This practically means that the purpose of the function is to create the return string in a certain way. That string will be of the format “Your X number is Y”. The values that we pass to the function are the integer values brojac and broj corresponding to the value X and Y, respectively. The number of dice rolls is stored in the variable brojac while the value of the randomly generated number is passed through the broj. variable. The moment the function is called, the sequence is concatenated with the concat function, whose only parameter is the string that is appended to the existing one. The return keyword returns the formed string and places it in the porukavariable. This function will only be called when the value of randBroj is non-zero.
Function – prikaziPoruku
This may seem the most complicated, but it’s actually very simple. The prikaziPoruku function actually only displays and animates the text at the beginning of the program execution. The cursor is placed in the first column of the first row and the message “Welcome” is displayed. The first for loop has 6 iterations and will move the “Welcome” text one column at a time to the right edge of the screen. This is simply done with the scrollDisplayLeft function. There are 6 iterations of this loop with a delay of 500 milliseconds. When these two values are multiplied, the animation duration is 3 seconds as defined by the assignment. The second for loop does exactly the same thing to the left.
After executing these two for functions, noAutoscroll “turns off” further animation of the text that will be displayed on the screen. The screen is then cleared to display the “Roll the Dice” message.