Introduction to Relays and Arduino
Relays are electrically operated switches that allow low-voltage circuits to control higher-voltage devices. In the context of using Arduino, a popular microcontroller, relays serve as a crucial interface between the low voltage output of the Arduino and the high voltage required by lightbulbs. This capability is essential for projects that involve home automation or any applications requiring control over high-power devices while ensuring user safety and device integrity.
At its core, a relay consists of an electromagnet and a set of contacts. When the electromagnet is energized by a low-voltage signal from the Arduino, it creates a magnetic field that pulls the contacts together, completing the circuit and allowing current to flow through the connected high-voltage device, such as a lightbulb. When the voltage is removed, the contacts open, thereby disconnecting the high-voltage circuit. This process illustrates how a microcontroller can effectively manage devices that operate at voltages beyond its operational limits.
There are various types of relays available, including electromagnetic relays, solid-state relays, and reed relays, each with unique characteristics suitable for different applications. For instance, solid-state relays are particularly beneficial when speed and silence are critical, whereas traditional electromagnetic relays provide a reliable mechanical solution. Regardless of the type chosen, all relay circuits should incorporate safety mechanisms to prevent electrical hazards. Proper implementation includes using protective components and adhering to design guidelines, especially when integrating Arduino into circuits involving high voltages.
In summary, understanding relays is imperative for anyone looking to extend the functionality of an Arduino into the domain of high-voltage applications. By leveraging the principles of relays, users can build robust, safe, and effective control systems for lightbulbs and other electrical devices.
Required Components and Setup
To successfully control lightbulbs using an Arduino, it is essential to gather the necessary components and understand the setup process. This beginner’s guide will outline the key elements you need and how to connect them effectively.
The primary component required is the Arduino board. An Arduino Uno is often recommended for its simplicity and extensive community support. Additionally, you will need a relay module. A typical relay module with 1 or 2 channels will suffice for controlling one or two lightbulbs respectively. Make sure the relay is rated appropriately for the voltage and current of your lightbulb.
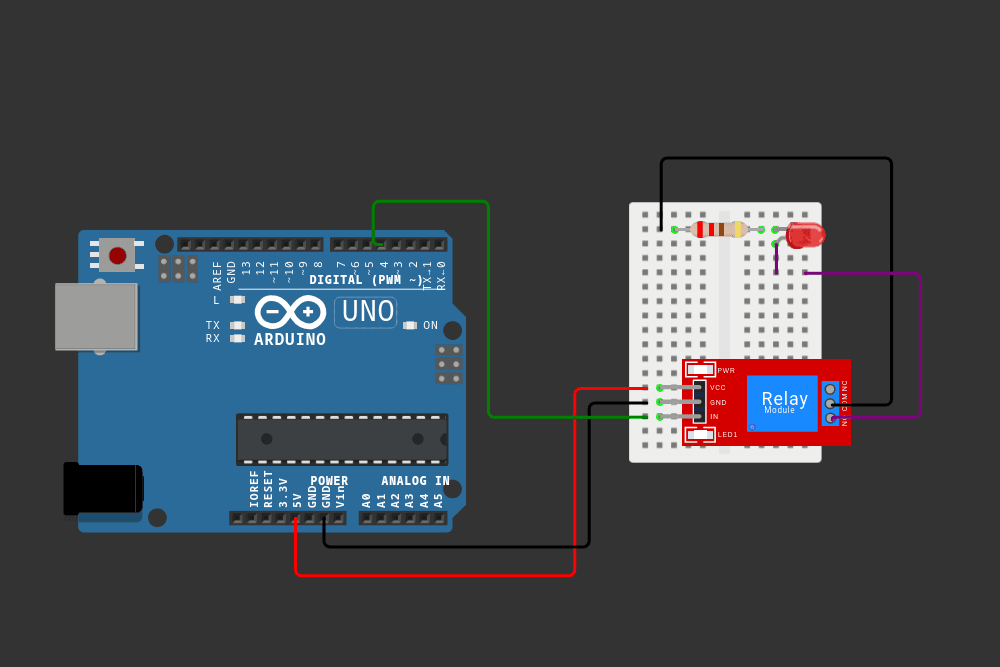
Next, you will need the lightbulb you wish to control. In the following electrical diagram lightbulb is represented by a LED. Incandescent or LED bulbs can be used, but ensure the bulbs are compatible with the relay specifications. For wiring, a set of jumper wires is essential for making connections between the Arduino, relay module, and lightbulbs. Furthermore, a breadboard can facilitate the assembly of your circuit, though it is not strictly necessary.
Once you have gathered the components, it’s time to set up the circuit. Begin by connecting the relay module to the Arduino. Typically, this involves linking the VCC and GND pins of the relay to the corresponding power pins on the Arduino. The IN pin on the relay connects to a digital I/O pin on the Arduino, which will control the relay.
Next, integrate the lightbulb with the relay. This step usually requires connecting the lightbulb’s wires to the relay’s Normally Open (NO) and COM terminals, allowing the microcontroller to control the power supply to the lightbulb. It is crucial to follow a wiring diagram, which can be easily found online, to ensure that connections are made correctly and safely.
By following these steps carefully, you will establish a functional circuit that allows you to control lightbulbs via the Arduino. Make sure to double-check connections before powering the circuit to prevent any short circuits or potential hazards.
Writing the Arduino Code for Relay Control
In this example, the operation of the light bulb is controlled by an Arduino and a relay, with the possibility of connecting any high-voltage consumer instead of the light bulb. The program enables the management of the consumer by entering commands from the computer, and the communication is carried out serially (or remotely via the Internet, Bluetooth or other connection). The available commands are:
- #ON – turns on the consumer
- #OFF – turns off the consumer
- #SOS – emits an SOS signal using a consumer
- #REPEAT – enables the automatic inclusion of consumers in certain time intervals, which the user defines in the program.
The program provides the following functionalities:
- Basic management – simple switching on and off of consumers.
- SOS signaling – the consumer is used to send an SOS signal using Morse code (a shorter switch represents a dot, and a longer switch represents a line).
- Periodic switching on – it is possible for the consumer to switch on automatically at certain intervals (eg every hour, every 12 hours, once a day) and work for a certain time.
Demonstration example: A consumer turns on every 10 seconds and stays on for 3 seconds, after which it is turned off for 7 seconds.
The code
constexpr int relay = 4;
constexpr unsigned long repTime = 10000;
constexpr unsigned long operatingTime = 3000;
unsigned long currTime;
unsigned long prevTime = 0;
String command = "";
int signal = 0;

void setup() {
  pinMode(relay, OUTPUT);
  Serial.begin(9600);
}

void loop() {
  //Serial.println(signal);
  switch(signal) {
    case 1:
      turnOn();
      break;
    case 2:
      turnOff();
      break;
    case 3:
      sendSOS();
      break;
    case 4:
      repeatTask();
      break;
  }

}

void turnOn() {
  digitalWrite(relay, HIGH);
}

void turnOff() {
  digitalWrite(relay, LOW);
}

void sendSOS() {
  for(int i = 0; i < 3; i++) sendChar(200);
  for(int i = 0; i < 3; i++) sendChar(500);
  for(int i = 0; i < 3; i++) sendChar(200);
}

void sendChar(int duration) {
  turnOn();
  delay(duration);
  turnOff();
  delay(duration);
}

void repeatTask() {
  currTime = millis();
  if(currTime - prevTime >= repTime)
    prevTime = currTime;

  if(currTime - prevTime <= operatingTime)
    turnOn();
  else
    turnOff();
}

void serialEvent() {
  command = Serial.readStringUntil('\n');
  command.trim();
  if(command == "#ON") signal = 1;
  if(command == "#OFF") signal = 2;
  if(command == "#SOS") signal = 3;
  if(command == "#REPEAT") signal = 4;
}
Safety Precautions and Conclusion
When working with high-voltage devices, safety cannot be overstated. It is crucial to take the necessary precautions to ensure both personal safety and the proper functioning of the equipment. First and foremost, all connections involved in controlling lightbulbs with Arduino and relays should be secure and free from any loose wires. Loose connections can lead to arcing, which poses a fire risk and can damage components.
Additionally, using insulated tools is highly recommended when handling electrical components. Insulated tools are designed to protect the user from electric shock and should always be the first choice when working in environments where high voltage is present. Furthermore, it is essential to double-check all wiring before applying power. A systematic review of each connection ensures that no errors exist, which could lead to dangerous situations.
As beginners venture into the world of Arduino and relays, they may find the application of these components in light control particularly rewarding. Relays offer a robust solution for managing high-voltage devices, allowing users to control lightbulbs safely and efficiently. The understanding gained from such projects provides a foundation for tackling more complex applications in the future. Equipped with their newly acquired knowledge, users will likely feel inspired to explore further and undertake advanced projects, harnessing the potential of Arduino in innovative ways.
In conclusion, it is paramount to adhere to safety measures while working on electronics projects involving relays and light control. By ensuring secure connections, utilizing insulated tools, and thoroughly checking wiring, users can significantly minimize risks. As they move forward, the benefits of using relays with Arduino not only enhance their current projects but also lay the groundwork for more elaborate electronic adventures ahead.