In this post, you’ll learn how to use a shift register (IC 74HC595) and a 7-segment display (model 5161AS) to track people entering and leaving a room. With these components and a few buttons, you’ll build a system that displays the current number of people in the room. Previously, I covered using the 7-segment display and shift register separately; now, I’ll show you how to combine them and add some cool effects to the display.
Project description with 7-segment display and shift register
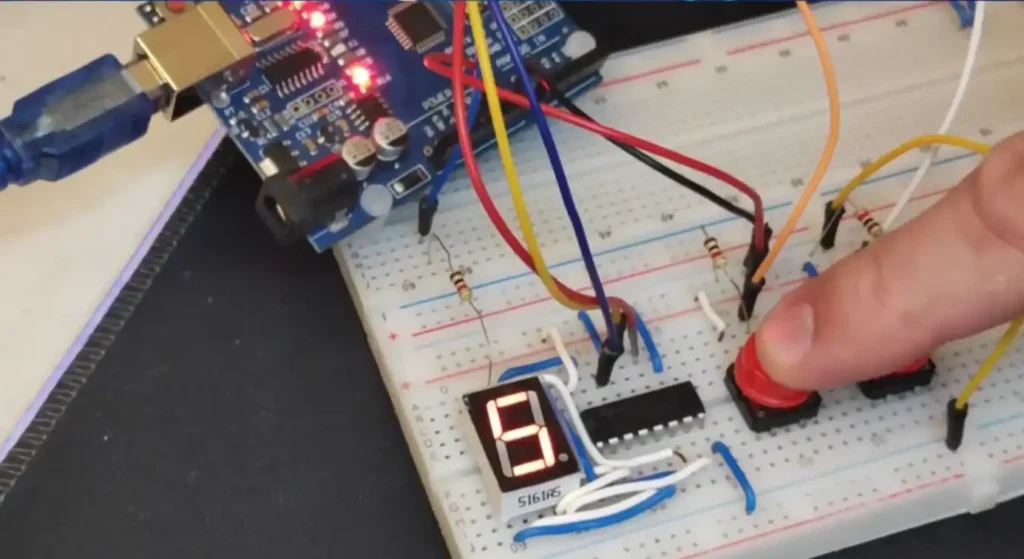
The entry and exit of people from the room will be simulated using buttons. Pressing the “Enter” button increases the counter by 1, while pressing the “Exit” button decreases it. The current count is displayed on the 7-segment display. With only one display module, the counter ranges from 0 to 9. A shift register controls the display operation. When the room is empty, the number 0 appears. If the room reaches its maximum capacity (for demonstration purposes, 9), the number 9 flashes on the display twice per second.
Program and detailed explanation
int latchPin = 9;   //pin 12 on the 595
int dataPin = 8;    //pin 14 on the 595
int clockPin = 10;  //pin 11 on the 595

const int btnUp = 3;
const int btnDown = 2;
volatile int pplCount = 0;
int prevPplCnt = 0;
const int segPin = 5;

int numbers[] = { 95, 6, 59, 47, 102, 109, 125, 7, 127, 111 };

void setup() {
  pinMode(latchPin, OUTPUT);
  pinMode(dataPin, OUTPUT);
  pinMode(clockPin, OUTPUT);
  pinMode(segPin, OUTPUT);

  Serial.begin(9600);

  attachInterrupt(digitalPinToInterrupt(btnUp), incCounter, RISING);
  attachInterrupt(digitalPinToInterrupt(btnDown), decCounter, RISING);
}

void loop() {
  Serial.println(pplCount);
  if (pplCount != prevPplCnt || pplCount == 0) displayNumber(pplCount);

  if (pplCount == 9) {
    digitalWrite(segPin, HIGH);
    delay(250);
    digitalWrite(segPin, LOW);
  }
  delay(10);
}

void displayNumber(int br) {
  digitalWrite(latchPin, LOW);
  shiftOut(dataPin, clockPin, MSBFIRST, numbers[br]);
  digitalWrite(latchPin, HIGH);
}

void incCounter() {
  static unsigned long lastMicros = 0;
  // button debouncing
  if (micros() - lastMicros > 250000) {
    if (pplCount < 9) pplCount++;
  }
  lastMicros = micros();
}

void decCounter() {
  static unsigned long lastMicros = 0;
  // button debouncing
  if (micros() - lastMicros > 250000) {
    if (pplCount > 0) pplCount--;
  }
  lastMicros = micros();
}
This Arduino code actively controls a 7-segment display through a 74HC595 shift register, using increment and decrement buttons to adjust the pplCount. The current count is shown on the display, and when pplCount reaches 9, the segment pins toggle every 250 milliseconds, causing the number on the display to blink. Here’s a detailed look at the key components and how they work:
Declaration Section
The code begins by defining the pins for controlling the 595 IC (`latchPin`, `dataPin`, `clockPin`) and for reading button presses (`btnUp`, `btnDown`). It also defines variables for counting people (`pplCount`), storing the previous count (`prevPplCnt`), and controlling the 7-segment display (`segPin`). Additionally, it initializes array (`numbers[]`) for displaying digits on a 7-segment display.
Configuration function
In the `setup()` function, the operation mode of the pins connected to the 595 IC and serial communication is set. Interrupts are tied to the `btnUp` and `btnDown` pins to call the functions (`incCounter` and `decCounter`) whenever these keys are pressed.
Loop function
The main logic of the program runs in the `loop()` function. It prints the current number of people to the serial monitor, and checks if the number has changed or is zero to update the display.
Display Number Function
The function `displayNumber(int br)` is responsible for updating the 7-segment display with the current number of people. It uses the `shiftOut` function to send the binary representation of the number to the 595 IC, which then controls the display segments.
ISR functions
The `incCounter()` and `decCounter()` functions are called via interrupts when the corresponding keys are pressed. They simply increment or decrement the `pplCount` variable within certain limits.
Final word
The code demonstrates the basic interaction between the hardware components (buttons, 7-segment display, and microcontroller) through software, showing how to read inputs, manipulate outputs, and manage state changes in response to user actions.