Introduction
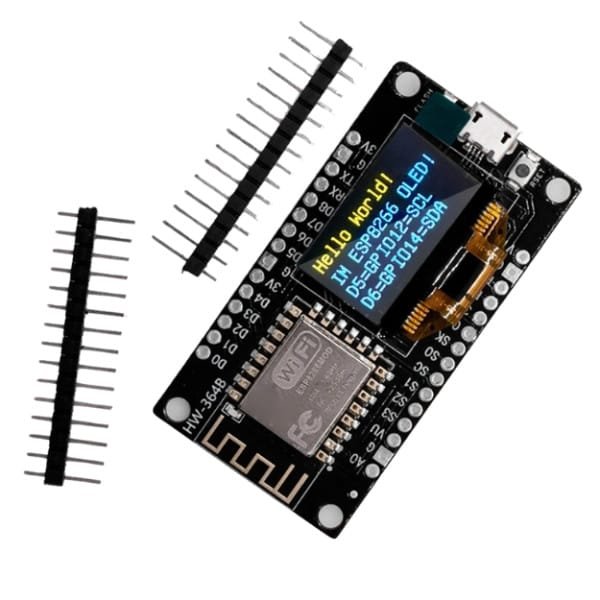
The ESP8266 OLED HW-364A is a compact yet powerful development board that merges the Wi-Fi capabilities of the ESP8266 microcontroller with the convenience of an integrated OLED display. This combination makes it an excellent choice for IoT applications, sensor monitoring, and embedded systems, where real-time data visualization and wireless connectivity are crucial.
Unlike bare ESP8266 modules, this board comes with a pre-soldered SSD1306 OLED screen, eliminating the need for additional wiring when you need a simple user interface. Whether you’re building a smart home device, a portable sensor logger, or a Wi-Fi-enabled display, this microcontroller provides an accessible and efficient solution.
In this article, we’ll take a closer look at its key features, how to set it up, and some practical project ideas to inspire your next build.

Why Choose the ESP8266 OLED HW-364A?
1. Powerful Yet Affordable Wi-Fi Connectivity
At its core, the ESP8266 is a low-cost, highly capable microcontroller with built-in 802.11 b/g/n Wi-Fi, making it perfect for IoT applications. It features:
– An 80 MHz Tensilica L106 processor (comparable to basic Arduino boards but with Wi-Fi).
– GPIO, I2C, SPI, and UART interfaces for connecting sensors and peripherals.
– Support for Arduino IDE, MicroPython, and NodeMCU firmware, giving developers flexibility in programming.
Since it includes Wi-Fi out of the box, you can easily connect it to home automation systems, cloud services (like MQTT or Firebase), or even use it as a web server.
2. Built-in OLED Display for Instant Feedback
One of the biggest advantages of this board is its integrated 0.96-inch SSD1306 OLED screen (128×64 pixels). Unlike traditional setups where you’d need to wire a separate display, this board comes ready to use, allowing you to:
– Display sensor readings in real-time (temperature, humidity, etc.).
– Show debugging messages without needing a serial monitor.
– Create simple menus or status indicators for user interaction.
This is especially useful for portable projects, where a small, low-power display is needed to provide immediate feedback.
3. Compact and Breadboard-Friendly Design
The board is designed to be small and easy to prototype with:
– Pre-soldered headers for quick breadboard connections.
– Micro-USB port for both power and programming (no external FTDI adapter needed).
– Reset and Flash buttons for easy firmware updates.
Its compact size makes it ideal for wearables, embedded systems, and small enclosures, where space is limited.
4. Open-Source Hardware for Customization
The ESP8266 OLED HW-364A is an open-source project, meaning its schematics and design files are available on GitHub. This allows you to:
– Modify the board layout if needed for a custom PCB.
– Understand the circuitry for troubleshooting.
– Extend functionality by adding extra components.
This openness makes it a great choice for both beginners learning electronics and advanced users developing custom solutions.
Getting Started: Setting Up the Board
1. What You’ll Need
Before diving in, make sure you have:
– The ESP8266 OLED HW-364A board.
– A Micro-USB cable (for power and programming).
– Arduino IDE or PlatformIO (for writing and uploading code).
– USB drivers (if your board uses a CP2102 or CH340 chip).
2. Installing the Necessary Software
Using Arduino IDE
- Install the ESP8266 Board Package:
- Open Arduino IDE → File → Preferences.
- In Additional Boards Manager URLs, add: http://arduino.esp8266.com/stable/package_esp8266com_index.json
- Go to Tools → Board → Boards Manager, search for ESP8266, and install it.
- Install the OLED Library:
- The most common library for the SSD1306 display is Adafruit SSD1306.
- Install it via Sketch → Include Library → Manage Libraries.
- Select the Correct Board & Port:
- Under Tools → Board, choose NodeMCU 1.0 (ESP-12E Module).
- Select the correct COM port (check Device Manager if unsure).
Using PlatformIO (Alternative for Advanced Users)
If you prefer PlatformIO (which offers better dependency management), you can:
– Create a new project for NodeMCU 1.0.
– Add the required libraries (Adafruit SSD1306, Wire) via platformio.ini.
3. Uploading a Test Program
To verify everything works, upload a simple “Hello, OLED!” sketch:
#include <Wire.h>
#include <Adafruit_GFX.h>
#include <Adafruit_SSD1306.h>

#define SCREEN_WIDTH 128
#define SCREEN_HEIGHT 64
Adafruit_SSD1306 display(SCREEN_WIDTH, SCREEN_HEIGHT, &Wire, -1);

void setup() {
  display.begin(SSD1306_SWITCHCAPVCC, 0x3C);
  display.clearDisplay();
  display.setTextSize(1);
  display.setTextColor(WHITE);
  display.setCursor(0, 10);
  display.println("Hello, OLED!");
  display.display();
}

void loop() {}
If the display lights up with text, you’re ready to build your first project!
Project Ideas to Try
1. Wi-Fi Weather Station
- Fetch real-time weather data from APIs like OpenWeatherMap.
- Display temperature, humidity, and forecasts on the OLED.
- Optional: Log data to a cloud database (Google Sheets, Firebase).
2. IoT Sensor Dashboard
- Connect DHT11 (temperature/humidity) or BMP180 (pressure) sensors.
- Show live readings and send alerts via Wi-Fi (e.g., Telegram notifications).
3. Smart Home Control Panel
- Use MQTT to communicate with home automation systems (Home Assistant, Node-RED).
- Control lights, fans, or appliances via relay modules.
- Display status updates (e.g., “Light ON,” “Fan OFF”).
4. Portable Network Scanner
- Scan nearby Wi-Fi networks and display signal strength.
- Useful for network troubleshooting.
Final Thoughts
The ESP8266 OLED HW-364A is a fantastic all-in-one development board for IoT, DIY electronics, and rapid prototyping. Its built-in display and Wi-Fi save time and reduce wiring complexity, making it a great choice for both beginners and experienced makers.
If you’re looking for a low-cost, feature-packed microcontroller for your next project, this board is definitely worth considering.
🔗 GitHub Repository: ESP8266 OLED HW-364A
What’s Next?
In the next posts I will write about the AHT20+BMP280 sensor and a practical project using this microcontroller.
The sensor measures temperature and humidity, while the ESP8266 OLED board sends the data to a web dashboard.
With the right API, you could also:
- Store readings in a database.
- Log them on a blockchain.
- Integrate them into smart home systems.
Stay tuned for the full guide!